Scenario Editor Manual
Contents
Video tutorial
Creating a New Scenario
Scenarios are created and edited from within the Pharmacy Simulator software. First ensure you have run the Pharmacy Simulator software/app and logged in to your account.
Open the Main Menu (you can do this by clicking on the Main Menu button or pressing the Escape key).
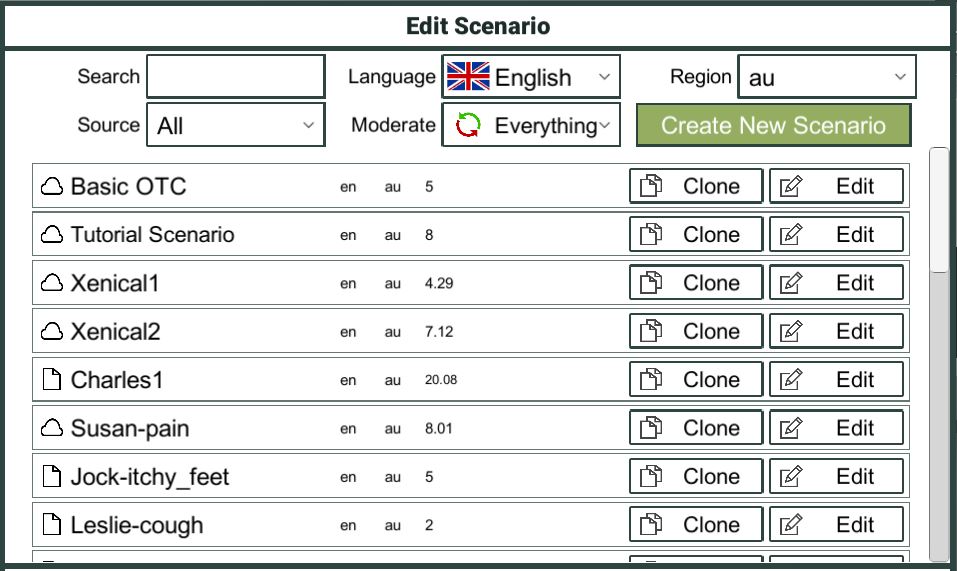
Click the "Edit Scenario" button. This will open a menu that lets you load scenarios for editing.
Click the "Create New Scenario" button at the top right of the menu. You will be prompted to enter a name, language and region for the new scenario, and then be taken to the Edit Scenario menu.
Edit an Existing Scenario
Scenarios are created and edited from within the Pharmacy Simulator software. First ensure you have run the Pharmacy Simulator software/app and logged in to your account.
Open the Main Menu (you can do this by clicking on the Main Menu button or pressing the Escape key).
Click the "Edit Scenario" button. You will be presented with the list of scenarios you have access to.
If you are flagged as the owner or a collaborator for the scenario, you will be able to make changes to the existing scenario by clicking the "Edit" button. If you are not the original owner, and have not been added as a collaborator, you are only able to edit a COPY of the scenario. This is also a great way to make a variation of an existing scenario, without overwriting the existing scenario. Click the "Clone" button to make a copy, you will be prompted to select a new name, language, and region for the new scenario.
Edit Scenario Menu
When you first open the Edit Scenario interface, you will be presented with 3 tabs: General, Actors, Event Responses.
Click the links to find out more about how to use each Tab.

Saving and Sharing/Uploading
At the bottom of the scenario editing window are three buttons, "Save", "Save and Preview", and "Upload & Share".
When you are editing a scenario, your changes are made locally on your own device. They are not uploaded to the server and shared with other users until you are ready. Similarly, you will not see them on your other devices until you have uploaded the scenario.
Clicking the "Save" button saves the changes you have made to the scenario locally, over the top of the existing file.
Clicking "Save and Preview" does the same, but then immediately loads the scenario so that you can play through and check to see if it is behaving as you expect.
Clicking "Upload & Share" will package up the scenario and upload it to the Pharmacy Simulator webserver. Other users will be able to see and play it nearly immediately, however, it will initially be marked as "pending moderation" so other users will have to change their filters to allow unmoderated content.
It will be reviewed by a trusted moderator at their earliest convenience, who will determine if the scenario can be promoted to "trusted" status. They will only reject this if the scenario
- is unreasonably offensive, or abusive
- is not fully functional
- does not meet minimum quality standards re: accuracy/appropriateness/detail
If the scenario has minor errors that can be fixed by the moderator, the moderator may edit the scenario to repair these errors before upgrading it to trusted, or they may contact you to request that you make the necessary revisions at your convenience.
If the scenario is deemed intentionally offensive, abusive, or has the potential to otherwise harm or damage our users experience, it may be removed from the system.
Once the scenario passes moderation, it will be marked as trusted and become available to all users of Pharmacy Simulator.
General Tab
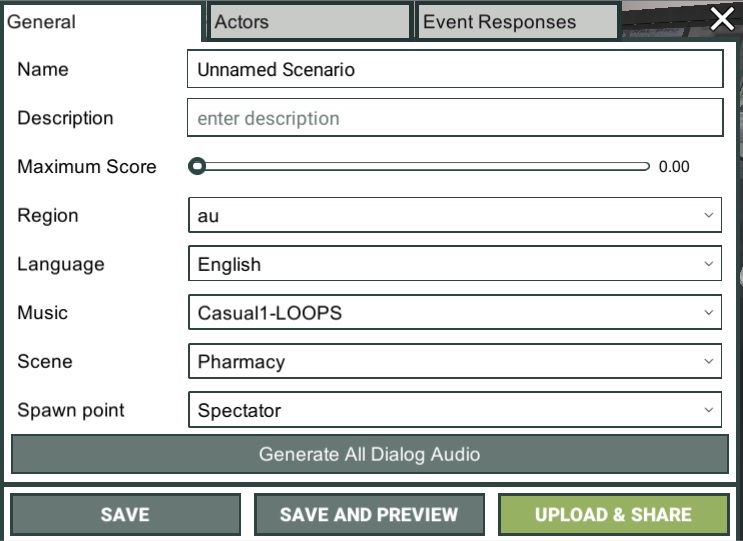
In the General tab you will be able to set the scenario name, description, maximum score, region, language, starting music, starting scene, and the player's initial spawn point.
Once you have written all the dialog for the scenario, you can also press the "Generate All Dialog Audio" button, which will use Google text-to-speech services to convert all speech lines from the Actors in the scene into spoken words.
First, enter a name for your scenario. This name must be unique, so that nobody will confuse it with another scenario. It must also adhere to filename conventions, so you won't be able to use certain special characters, such as back-slash \, forward-slash /, and dollar-sign $.
Now enter a brief description of the scenario. Try to keep the description under about 70 characters,
while giving the player some idea of what the scenario is about, such as: "Charles has a new asthma
inhaler", or "Jane wants pain relief for a headache".
We can ignore the maximum score slider for now, since we don't yet know what the maximum attainable score for our scenario will be. We can come back later and set this once we've figured it out.
It is important to set the region. This defines which part of the world the scenario takes place in, and which product database will be available.
It is also important to correctly set the language. This defines what language the player should expect the scenario to be in.
Note: When players are loading scenarios, the menu filters scenarios so that the player only sees scenarios which are set in the region and language they're interested in.
You may optionally choose the starting music for your scenario, which can help to change the tone of the scenario and set varying different moods for the player.
You may select which scene the scenario takes place in: if you choose Pharmacy, it will be set in our community pharmacy environment. If you select hospital it will be set in our hospital ward environment. If you select clinic it will take place in our general practice (family doctor) environment.
There are two more dropdowns for player role and difficulty. It is important to set appropriate values for these fields, as users will use these values to find scenarios that suit their needs.
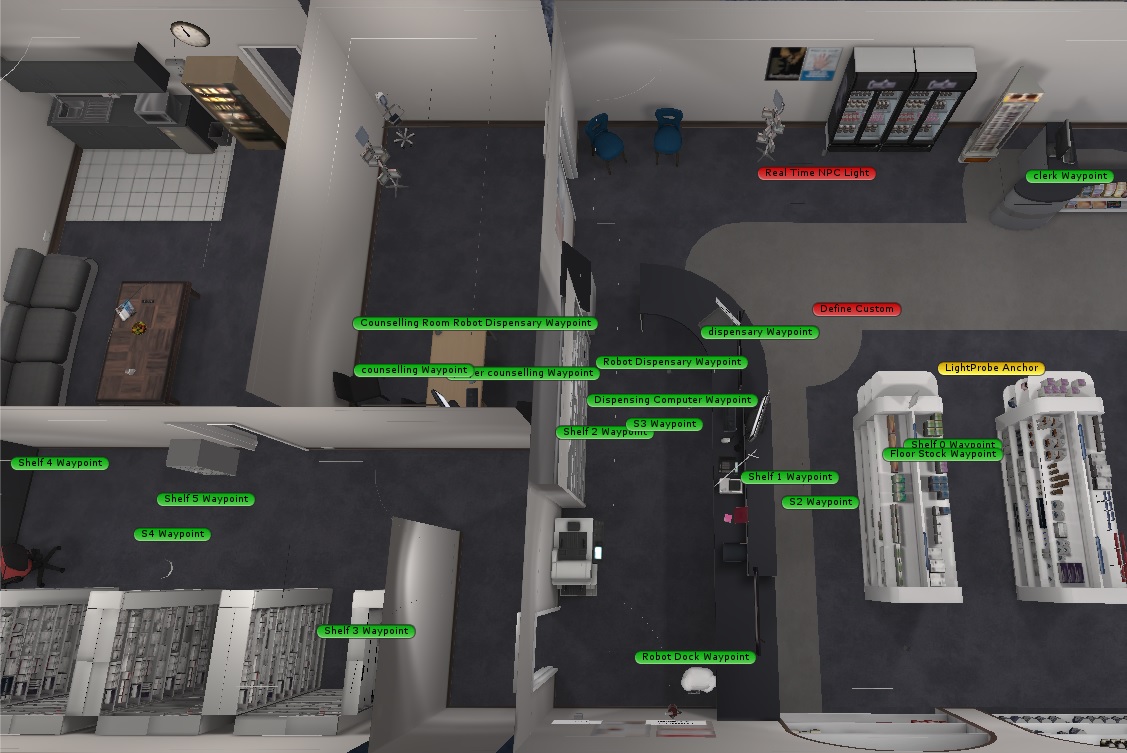
The final detail to add here is the player's starting Spawn Point. There are various spawn points in the scene at which both players and Actors can spawn (appear). In most cases for scenarios set in the community pharmacy setting, you will choose the Pharmacist spawn point, which is located just behind the pharmacy counter.
There is also a button here to "Generate All Dialog Audio" - this will use Google text-to-speech services to generate dialog audio files for all the speech that is in your scenario. You can come back and press this button at any time, and it will generate the audio files for lines which have been changed.
Note: Generating audio takes a little while and uses your bandwidth. We generally recommend that you wait until you are confident that the scenario dialog is ready, or close to ready, so that you don't generate a lot of voice lines that you won't end up using.
The last thing you can do here is add collaborators - if you want a friend or colleague to be able to make changes to your scenario (once it has been uploaded/shared) you can type their username in here and click "Add".
Having set up these basics, you are now ready to add your first Actor to the scenario. Click on the "Actors" tab.
Actors Tab
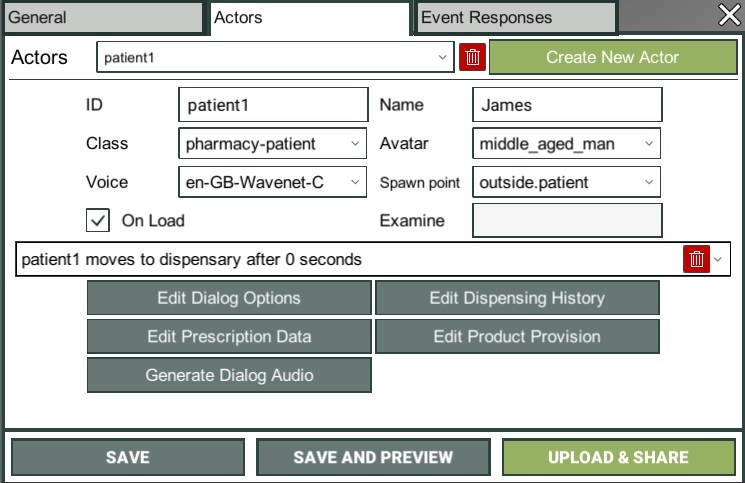
In the Actors tab you will be able to create actors and edit every detail about how they behave, including what dialog options they have available, what prescriptions they have, their dispensing history, and what happens when you give them certain products.
Once you have written the dialog for the Actor, you can also press the "Generate Dialog Audio" button, which will use Google text-to-speech services to convert all speech lines from the selected Actor into spoken words.
First, click the "Create New Actor" button to add your first Actor into the scenario.
Initially your new Actor will have placeholder attributes. You will need to give them a sensible
unique identifier, such as "patient1", and a player-friendly name, such as "James" in the example
screen above.
Note: If the Actor is meant to be a pharmacy patient, you should set the class to
"pharmacy-patient". This will unlock the ability to define prescriptions
, product provision rules, and
dispensing history.
If the actor is meant to be a hospital patient, you should set the class to "hospital-patient". This
will unlock the ability to define their vital signs, and populate their patient chart.
If the Actor is meant to be accessible via the telephone, rather than in person, you can set the class to "telephone".
You can set the Spawn Point to any of the available spawn points, but in most cases the default spawn point "outside.patient" will be fine. This will spawn the Actor just a few metres from the dispensary counter.
It is not necessary to set the Examine text at this time.
Select an appropriate looking avatar from the list: the options are depicted in the drop downs below.
If the "On Load" checkbox is ticked, then the Actor will spawn when the scenario has finished loading. Un-tick this checkbox if you want the Actor to be spawned later in the scenario as part of a separate spawn event.
You do not need to set the actor's Voice at this time, but if you intend to use the Google text-to-speech feature to automatically generate speech audio, you should take a moment to select an appropriate voice from this set of options. They are categorised by region, language and gender.
Destination
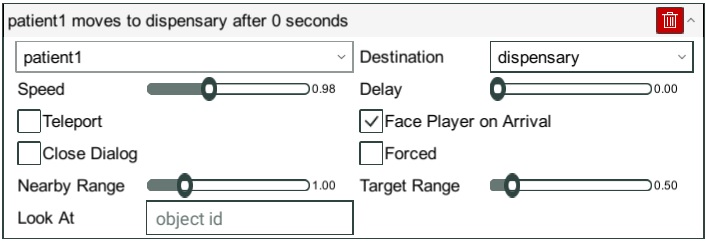
The next section of the Actor is their starting destination. If you click on this, it will expand to allow you to edit all the parameters.
All Actors must have a starting destination set, except for telephone Actors which obviously cannot walk.
It will default to walking the actor to the dispensary counter immediately after they spawn, and
facing the player when they arrive.
For more information on using the destination form, see the Destination section of the Responses chapter.
Dialog Options
One of the first things you will typically want to do once you have setup your Actor, is begin to write dialog options that the player can use to interact with them.
Clicking the "Edit Dialog Options" button will open up the Dialog editor window. Initially, it will only contain one button "Create New Dialog Option". Clicking this, will add a blank dialog option, which you can then customise.
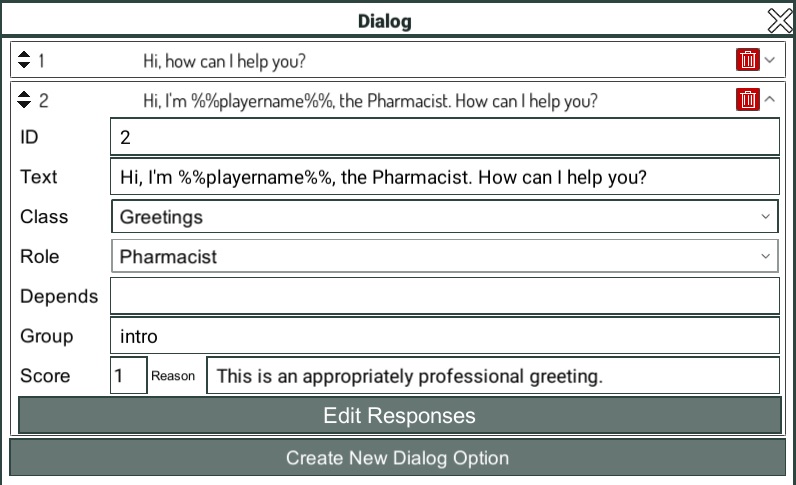
Clicking on the new dialog option will expand the box, showing all the details you can edit.
The ID field is a unique identifier for the dialog option. These ID fields are combined with the patient's unique ID to create a globally unique ID i.e. patient1.1 is the globally unique identifier for dialog option 1 on patient1.
The Text field allows you to enter the text of the dialog option. This is what will display on the
dialog button when the player is conversing with the actor.
Note: Try to avoid making these overly long if possible - some users will play the simulator with a very large font size due to poor vision, and excessively long dialog options will wrap over multiple lines and may be difficult to read in the dialog menu.
The "Class" field allows you to group the dialog options by type. Dialog options will display in the dialog menu under a separate Tab for each class. The default dialog option classes are "Greetings", "Questions", "Advice", "End". You can add as many classes as you like, but beware that if a given Actor has too many dialog option classes the tabs in the dialog option menu may get very squashed and become difficult for the player to read.
The Role field allows you to define which type of player has access to the given dialog option. In Pharmacy Simulator there is currently only one role available - Pharmacist - so this option is disabled.
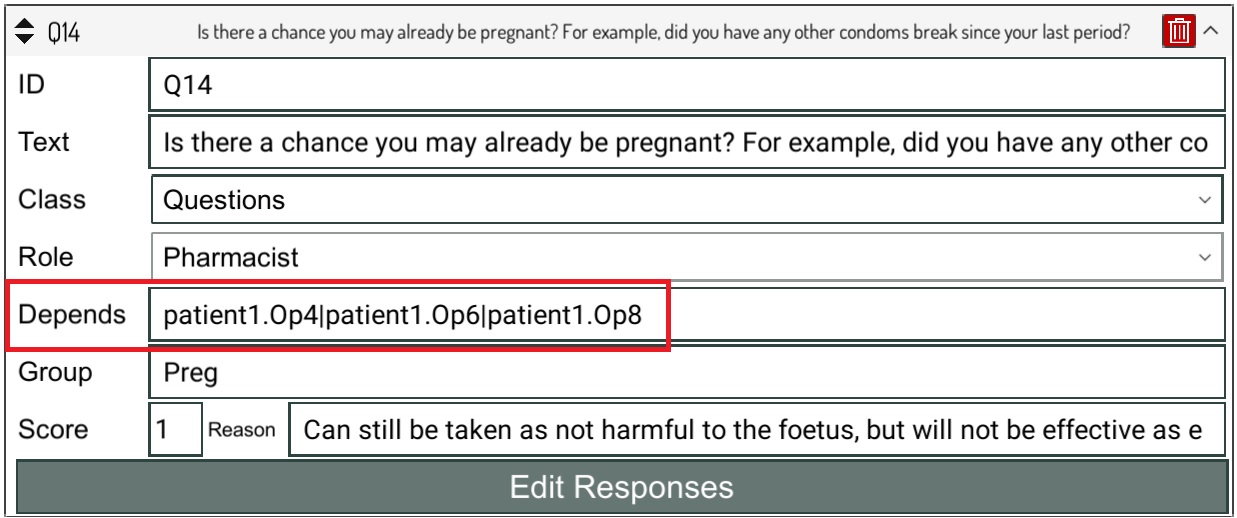
The Depends field allows you to write a logical rule that determines whether the player can or cannot see and use the dialog option at any given time. This field is perhaps one of the most difficult for new scenario authors to get their heads around, but in most cases the rule you write will be quite simple. For more detail, see the Dependency Rules section.
For example, if you want the dialog option to only become available after the player has already used dialog option 4 on patient1, you would write "patient1.4" in this field. If you want the dialog option to become available after the player has used any of the dialog options that are grouped as "intro" then you would write patient1.intro here. You can also combine terms using the & (AND) and | (OR) logical groupers. i.e. if you wrote patient1.1 | patient1.2 then the dialog option would be available if EITHER patient1.1 OR patient1.2 had been used. If you want the dialog option to be available only if dialog option 1 has NOT been used, you would use the ! (NOT) operator, and write "!patient1.1".
The Group field is an easy way to logically group a set of dialog options into a group, where the player is only able to choose ONE of the options in the group. Having chosen that one option, the other options will become unavailable. You can also use the group identifier in dependency rules later on in the scenario as mentioned above. For example, consider 3 options used for introducing yourself to the patient. If we give each of these options the group code "intro", then the player will only be able to select ONE of those three options. If you then want a follow on question, i.e. "Have you used this medication before?" to become available, you can write the dependency rule for that option as "patient1.intro" - this will unlock the new dialog option after any one of the introductions has been used.
The Score and Rationale field is used to define the end-of-scenario scorecard feedback for the player when they use this option. If it is a good dialog option for the player to choose, then consider giving them a small score reward, and enter a rationale that briefly explains why it is a good option. If the option is a poor choice, you may give them a 0 or negative score, and again enter a rationale that explains why the option is a poor choice.
The final thing to do when writing a dialog option is to define what the Response will be. To do this, we must enter the Response editor by clicking "Edit Responses".

Responses
A Response is an all-encompassing concept of what will happen when a given event has occurred.
In most cases a Response will occur after a dialog option has been used, but you can also define responses to a broad range of other events that might happen during the course of your scenario. For example, you might want a response to an actor reaching a certain destination, or a player using a certain piece of equipment.
When you first open the Response window, there will be no Responses defined, just the "Add Response" button. If you click this button, a Response item will be added to the list. Clicking on this item will expand it for editing.
The list of Responses shown in this window are the set of possible responses that can occur
after a given event (i.e. when the dialog option is used). Note: The simulator will
look through the list from top to bottom and will execute the first response which has its dependency
satisfied. Because of this, it is best practice to have your most specific responses at the
top of the list, and your most general responses (i.e. a response with no dependency rule) at the
bottom of the list. You can re-order the responses by clicking on the heading and dragging them over another response item.
The ID field allows you to define a unique identifier for the given response. This ID is combined with the event in question to create a globally unique identifier. For Response 1 to dialog option 2 on patient1 the globally unique identifier would be patient1.2.1.
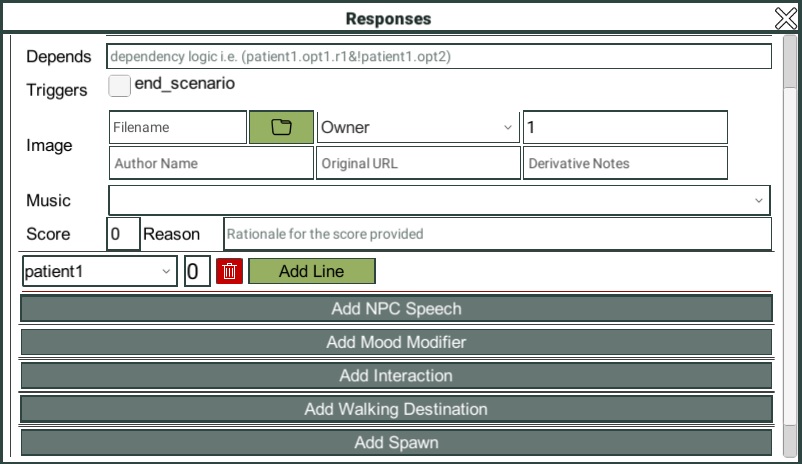
The Depends field allows you to write a logical rule that determines whether the given Response item will execute. For more detail, see the Dependency Rules section.
For example, if you want this Response to only fire if patient1 is sufficiently angry, then you can write "patient1.anger>0.3" here. If you do this, it is important to also have another Response lower in the list that can fire in the event where the patient is NOT sufficiently angry.
If this Response should trigger the end of the scenario, you can tick the "end_scenario" checkbox here. The scenario will end and the scorecard will display a couple of seconds after the event fires.
If the Response should display an image of some kind, you can set this here, or you can leave this field blank if no image is to be displayed. Clicking the file folder button will allow you to browse your computer's file system to select an image file (jpg or png format).
Note:The image will be COPIED into the scenario as is, so if you edit the original at a later date these edits will not be included in the scenario automatically.
If you do add an image, you should also set its copyright/licensing terms. If you are the original owner of the image (i.e. you took the photo or drew the image yourself) then you can select "Owner", otherwise you must select an appropriate Creative Commons license that the image is available under. The options here are:
- CC_0 = Creative Commons Free
- CC_BY = Creative Commons licensed with an attribution clause so that you must credit the original creator
- CC_BY_SA = Creative Commons licensed with an attribution and share-alike clause
- CC_BY_ND = Creative Commons licensed with an attribution and a no-derivative works clause
Please refer to http://creativecommons.org.au/learn/licences/ to learn more about the creative commons licensing terms and what they mean.
Having chosen your image license type, you can then enter values into the other fields as required.
The Delay field lets you define how long in seconds before the image is displayed, after the event occurs.
The Author Name field lets you provide attribution to the original creator of the image. Note: This field is required if you have selected any of the CC_BY licenses.
The original URL field lets you provide a link back to the original image.
The derivative notes field lets you provide notes about what changes have been made to the original image. Note: This field is required if you have selected the CC_BY_ND license.
Prescriptions are triggered as a special case of an Image. Enter the filename as "prescription.1" if you want to have the Response display prescription 1. You can see more about defining prescriptions in the Prescriptions section.
If the Response should trigger a change in the music, you can select from the music options in the dropdown here.
You may also optionally add a Score association to the response, or leave these blank if you prefer.
Responses can also optionally include SPEECH, MOODS, INTERACTIONS, DESTINATIONS, and SPAWN events.

Speech
To add Speech to the response, click the "Add Speech" button. Speech is made up of multiple Speech Lines. Select which Actor will be speaking from the dropdown list, then click the "Add Line" button to add the first line of speech. You can also optionally set a delay in seconds before the speech starts.
Each Speech Line is made up of Text, a "look at" command, an optional duration, an animated gesture, and a facial expression animation.
The Text field lets you write what the actor will say. This line of text will appear in a speech bubble above the actor's head when it is triggered.
In most cases, the "look at" dropdown box can be left as "none". This is usually only required when the actor is having a conversation involving multiple people, and needs to shift their focus from i.e. the player and another actor between lines of dialog.
Note: It is good practice to ensure at least half of the speech lines you write include a gesture and/or a facial animation. This gives the actor a lot more movement when they're interacting with the player, which makes the experience more immersive and interesting. It is also a good idea to avoid using the same gestures/expressions repeatedly. Try to space them out so the player is less likely to notice that the actor is recycling animations.
For longer sentences, try to break the speech up into multiple lines. This will make the interaction more interesting and easier to follow along for the player, rather than giving them one long wall of text squashed into one speech bubble. You can have as many lines as you like for a given speech.
You can also have more than one Actor deliver speech in a given response. If you click "Add Speech" again you can add as many actor/speech responses as you like to the Response.

Moods
A given Response can trigger changes in mood to any number of actors in the scenario.
Clicking the "Add Mood Modifier" button will add a mood entry to the response. It will default to affecting the currently selected Actor, but you can change this from the dropdown list.
Moods can be modified across two main parameters:
- "anger" which ranges from -1 to 1 where -1 is very happy and +1 is very angry
- "happiness" which ranges from -1 to 1 where -1 is very sad and +1 is very happy
The anger and happiness parameters can be used in dependency rules i.e. to determine which dialog options are available, and which Response will execute. We can use the less than (<) and greater than (>) symbols to good effect here: i.e. "patient1.anger>0.5" translates to "if patient1 is very angry".
The mood of the actor will also be reflected in their basic animations. As they get angrier their stance and body language will become more closed, agitated and grumpy. As they get happier their stance and body language will get more open and friendlier. In this way, the player should be able to identify at a glance what kind of mood the patient is in, if they're paying attention.
It is possible to simultaneously modify both anger and happiness, but the results can be confusing for the player to read. So it is best practice to ensure that you are only modifying either the happiness parameter or the anger parameter for a given actor at once.
By default, the mood will be modified i.e. the values you enter into the field will be added to the existing mood values that the actor has. If you tick the "Override" checkbox, this will change so that the actor will be given the exact mood values you enter.
For example, if you want the actor patient1 to get "a little bit more angry" when the player chooses a rude dialog option, you would set "0.2" in the anger field. If you want them to get quite angry, because the dialog option was very rude, you could use a value of "0.5". If you want to send them immediately into a rage you can enter "1.0" and tick the Override box.
In most instances it is better to gradually increment or decrement the parameters with smaller values around 0.2 or 0.3, or -0.2 or -0.3 but it is very dependent on the content and topic of the scenario. For example, if you are trying to write a scenario that teaches students how to deal with irate patients, you may even want the patient to start with an anger >0.5, before the player has even had any opportunity to influence them.

Interaction
A given Response can trigger an Actor to interact with other objects in the simulation.
Clicking the "Add Interaction" button will add a an interaction entry into the Response. You can add multiple interactions if you want to set up a sequence of actions, or if you want multiple actors to perform actions.
Having added an interaction, you can select from the dropdown boxes
- which Actor is performing the action.
- which object in the simulation the Actor is interacting with
- what action they are performing with the object in question
- what their target is for the action (where applicable)
- how much delay (in seconds) there is before the action occurs
To set up a sequence of actions, you can add multiple interaction items each with a gradually increasing delay. For example, the sequence of three interactions:
- patient Pistol take 0
- patient Pistol equip 0.2
- patient Pistol fire player 0.4
Could be used to have the patient first pick up, draw, and fire the gun in a sensible sequence, with 200ms of delay between each action.
Note: It is important in this case for the patient to perform these actions in this order, because they cannot equip a pistol they have not first taken, and they cannot fire a pistol they have not first equipped. Doing this in any other order and without appropriate delays will cause an error to occur when the patient tries to perform an invalid action.
Destination
A given Response can also include commands to make various actors, or the player themselves, move to various destinations within the scene.
By clicking "Add Walking Destination" you can add a new destination to the response, using the same destination form that we have seen before when setting the actor's starting destination.
The only difference here is you can specify which Actor is moving, and you can add multiple destination commands to a given Response, for either the same Actor (with a delay between them), or for different Actors (i.e. if you pull the fire alarm, you might want all the Actors in the scene to run for the exit at once).
You can select from any of the destination waypoints from the dropdown box.
You can set the speed with some precision. 1 = walking, 2 = running.
The delay is how long after the destination is triggered before the Actor commences walking.
If the Teleport checkbox is ticked, the actor will teleport instantaneously to their destination rather than walking.
If Face Player on Arrival is ticked, the actor will turn towards the player after they arrive. If not, the actor will remain facing in the direction they were when they arrived.
If Close Dialog is ticked then when the destination is triggered, it will forcibly close any dialog menus which are currently open on the actor. This generally does not apply to the starting destination, since the player cannot have talked to the actor since they only just spawned.
If Forced is ticked then the destination will be forcefully executed, even if some other influence is trying to prevent it from happening. This generally only applies when it is the player itself that is being made to move - the forced tag will mean the player cannot interrupt the destination.
The nearby range is measured in metres. It defines how far away the actor must be before they consider themselves "near" to their destination.
The target range is measured in metres. It defines how far away the actor must be before they consider themselves "arrived" at their destination. It is generally difficult for the actor to arrive exactly at their destination for various reasons, so a recommended minimum here is 0.5, increasing up to 1 or even higher if the actor appears to be having trouble reaching the given destination.
In the Look At field we can enter the ID of any interactive object in the scene. If this field is set the actor will turn their neck to look at the stated object after they arrive at their destination.

Vitals Modifier
A given Response can also have impacts on an Actor's vital signs.
You will be able to select the ID of the Actor that is being affected, plus the vital sign that is being influenced, the amount it is being influenced by, and the time over which that influence will be applied. By default the modifier will be added to the existing value. However, you can optionally make the vitals modifier an "Override" - which will cause the new value to replace the existing value.
Most of the standard vital signs are included: temperature, blood pressure, respiratory rate, heart rate, SpO2,
There are also a couple of non-standard vital signs "breathlessness", "delirium", "cough", and "pain". These are used to adjust the Actor's internal indicators for these variables, which will reflect in their animation when they're laying in a hospital bed. These vital signs each have a value of 0 = no animation, through to 1 = maximum animation effect. For example, setting a "cough" of 0.5 would result in the Actor having a moderate cough. While setting it to 1 would result in them having a strong cough. These vital signs cannot be "monitored" by the player, but they will see the animation.

Spawn
A given Response can also include commands to make Actors spawn (appear) in the scene.
The Actor must have already been added and configured in the Actors Tab. They should have also been configured such that they do not spawn On Load, by unticking the On Load checkbox.
An example of when you might do this is if the player presses the silent alarm - this would cause a police officer to spawn. The police officer's spawn point would be set to be outside, and their destination would be the player.
Dispensing History
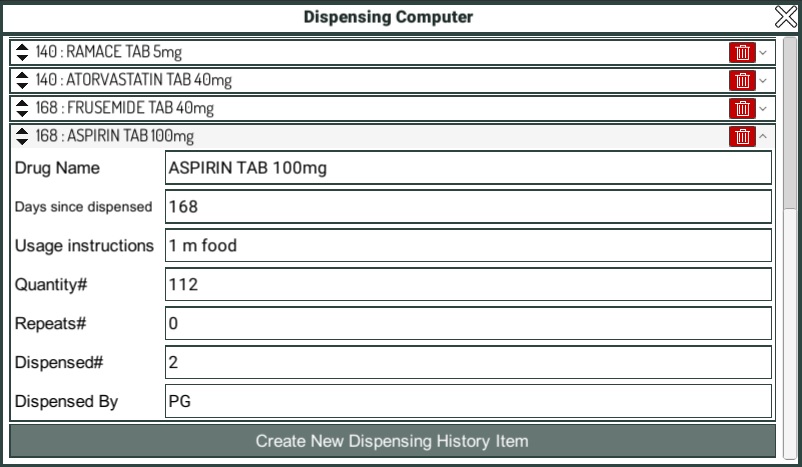
If we click on the "Edit Dispensing History" button from the Actors Tab, we will see the Dispensing History window. In this window we can set all the details about the currently selected patient that will be available to the player if they use the dispensing computer. This includes the patient's name, notes, and dispensing history.
Dispensing history is stored as a series of items, each one representing a medicine that has been previously dispensed. We can add a new item by clicking the "Create New Dispensing History Item" button.
By clicking on the item, it will expand so we can edit all its details.
The Drug Name field allows us to enter the name of the product that was dispensed. It can be any product you like, it does not have to exist in the product database, but it should be a real product that the student player would be aware of our able to look up in a reference.
The Days Since Dispensed field is used to indicate how long ago the medicine was dispensed, in days. i.e. 7 = the medicine was dispensed 1 week ago. Most users will be more familiar with the idea of indicating the particular date on which a product was dispensed, but this falls apart when we consider that students can play this simulated scenario at any time. By using the relative "days since dispensed" field we can ensure that a sensible dispense date is shown in the dispensing computer when the student reviews it.
The Usage Instructions field allows us to indicate what directions the product was dispensed with. Try to keep this field short, since space on the dispensing computer is at a premium. We recommend you use brief latin abbreviations i.e. "2 qid" rather than the expanded "2 tablets FOUR times a day", which convey all the necessary information in as few characters as possible. This also gives the students practice in interpreting latin abbreviations, a vital skill for a pharmacist or pharmacy technician.
The Quantity# field allows us to indicate how many of the medicines were dispensed.
The Repeats# field allows us to indicate how many repeats the patient had on their prescription which was used to collect this medicine.
The Dispensed# field allows us to indicate how many of these repeats had been used at the time the medicine was dispensed.
The Repeats# and Dispensed# field are summarised in the dispensing computer with a forward slash / between them. i.e. 3/4
The Dispensed By field allows us to enter the INITIALS of the pharmacist who dispensed the medicine. Again, space is at a premium in the dispensing computer, so we do not recommend you write out full names, when initials should suffice.
Prescriptions
Pharmacy patients can present with one or more prescriptions. If we click the "Add Prescription" button a new, blank prescription will be added to the patient.
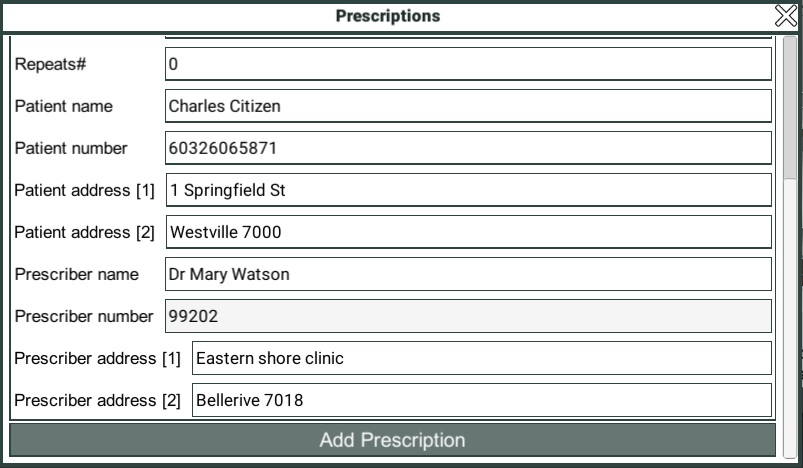
If we click on the prescription item it will expand so we can fill in the details of the prescription, including what product it is for, how many repeats, the doctor's name, etc.
Having defined the prescription, we must also ensure that the prescription is given to the player at an appropriate point - this is done separately as part of a Response, in the image section. Usually in response to the dialog option for "How can I help you?".
The Region field allows us to indicate what type of prescription template will be used, since different regions have different rules and regulations around how prescriptions should look, and what data they should include. This should generally default to the region of the current scenario.
The Search Products field allows us to search the product database for the product the patient is interested in, and then select it from the options that appear in the search results box.
The Directions field allows us to indicate the prescribers notes for how the medicine is to be used, this will typically be in latin abbreviation form i.e. 1 tds for "Take ONE tablet THREE times a day".
The Days since issued field allows us to indicate how many days ago the patient was given the prescription. This will be converted into an appropriate "date" field on the prescription when the student player sees it, relative to the current date.
The Quantity# field allows us to indicate how many of the product is to be dispensed.
The Repeats# field allows us to indicate how many repeat prescriptions have been approved by the prescriber.
The Patient Name field allows us to indicate the name of the patient for whom the prescription was written.
The Patient Number field allows us to indicate the patient's healthcare number/medicare number, as and if it is appropriate to do so based on the region.
The Patient Address [1] and Patient Address [2] fields allow us to indicate the patient's address. This detail may not be relevant in some regions, where it is not necessary to indicate the patient's address on prescriptions.
The Prescriber Name field allows us to indicate the prescribers name.
The Prescriber Number field allows us to indicate the prescribers identifying code.
Prescriber Address [1] and Prescriber Address [2] allow us to indicate where the prescriber works from. Again, this may not be relevant in some regions where this detail is not ordinarily included on the prescription.
Product Provision
By clicking "Edit Product Provision" on the Actors Tab, we can enter the product provision editor. This interface allows us to define what happens when certain products, or classes of products, are provided to the currently selected Actor.
To add a product/class of product, click "New Product Provision Response". If we click on the new item, it will expand so we can edit its details.
We can use the Search Products field to search the product database either for a specific product, or for a class of products, using the Anatomical Therapeutic Classification code.
Example: If you want to award points to the player for selecting any antihistamine product, you can search for "antihistamine". This will find several results for ATC codes. If you click the Down Arrow, you can learn more about the classification in question. In this case we would select "ANTIHISTAMINES FOR SYSTEMIC USE [R06A]", which includes all antihistamines except for those which are applied topically.
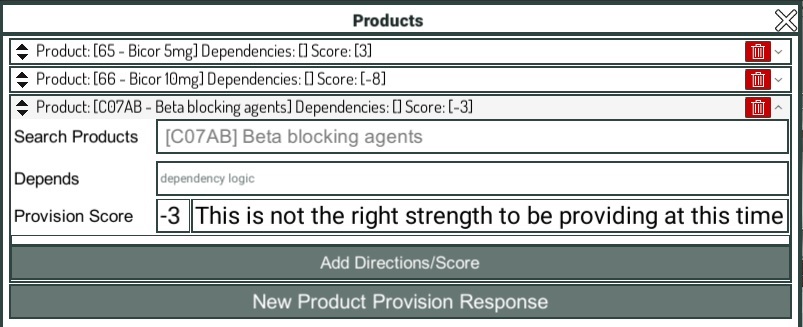
When a product is provided to the Actor, the simulator will check the list of product provision responses to see which one it should use, if any. As with normal Responses, it will look from the top of the list to the bottom of the list, and will stop once it finds a matching result.
In the example in the picture, we see a product provision rule which states that if any beta blocker is given to the patient they will receive a catch-all score of -3, because "this is the wrong strength". However, just above this there are items for Bicor 5mg, and Bicor 10mg which are also beta blockers. If you provide these specific products, their product provision response will execute first, and this bottom "catch-all" response will not execute.
Within the given product provision response we can also add a dependency rule. The dependency rule must resolve to TRUE in order for the product provision response to be executable.

Directions
For the given product provision response we can also define what will happen with various instructions/directions. By clicking the "Add Directions/Score" button it will add a directions item to the product provision response.
If we click on the directions item it will expand for editing. This will display an interface very similar to the one seen on the Dispensing Computer that the player can use, in which we can define an instructions label.
In the example shown in the figure, we see a directions item which defines what will happen if Bicor 5mg is given to the patient with the instructions "Take ONE tablet daily for 14 days then Take TWO tablets daily." In this case, the player will get a bonus 2 points for providing the correct instructions on the label.
Below that we can see an item that covers the case where the student provides a label which states simply "Take ONE tablet daily". In this case the student only gets 1 bonus point, because they missed out the important detail about increasing the dose after 2 weeks.
Using this system it is possible to define in great detail what will happen if the player gives any manner of products to the patient, with all types of instructions labels.
Note: We do not need to define product provision responses for every product we can imagine. Pharmacy Simulator has default rules that it falls back on if you have not given it specific instructions. It will simply give a negative score, with the feedback "This is the wrong product to supply." The negative score will be larger if the player gives the patient restricted medicines, and smaller if they give them benign products.
It is good practice to define product provision responses for all the classes of products you expect the player to experiment with for a given scenario though. This way you can give the student customised feedback which steers them towards the optimal outcome.
Event Response Tab
We have already discussed how to trigger Responses to a dialog option. However, it is useful at times to trigger Responses when various other types of Events occur. This can be done in the Event Response tab.
There are a wide range of events which are occurring during the playthrough of a scenario. Essentially every discrete thing that happens is considered to be an Event. If you can observe it happening, chances are it's considered an Event in Pharmacy Simulator.
This includes dialog options being used, responses firing, actors arriving at destinations, the player or actors interacting with/using objects, doors being opened, etc. You can review a complete list of possible Event Codes.
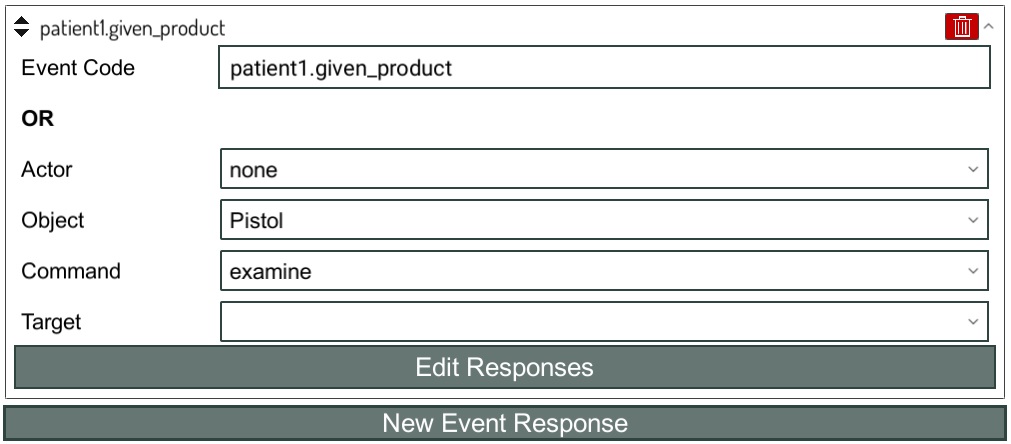
First, click the "Create New Event Response" button to add your first Event Response into the scenario. Once you've added an Event item, you can click on it to expand it and configure its details.
You can define which event you want to Respond to in one of two ways:
- explicitly, by writing an Event Code
- using the dropdown lists to define an event code
The explicit option is the most powerful way, and gives you access to Respond to any event that might occur. However, it is not always easy to know what the event identifier will be.
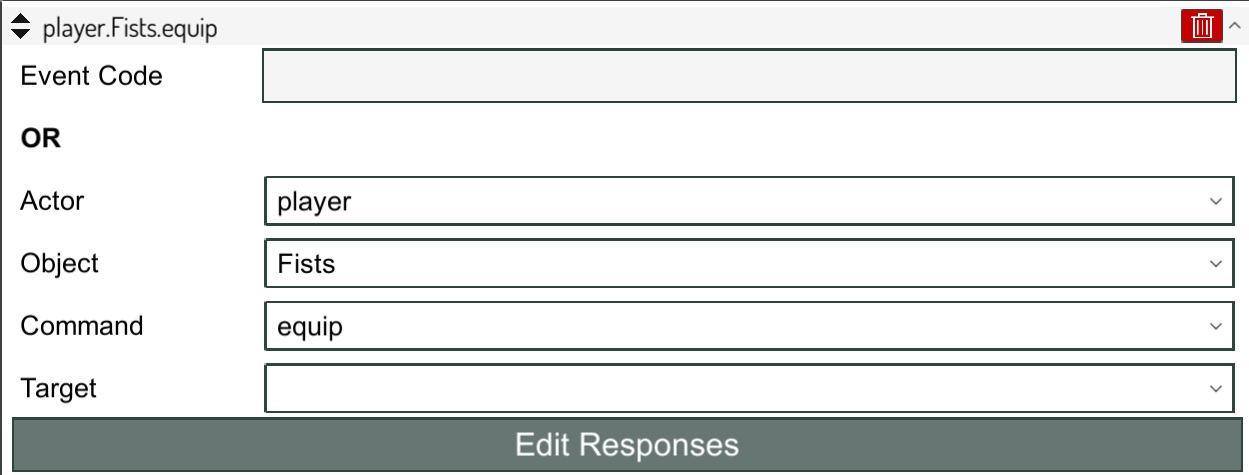
For most uses, the dropdown lists present a more user friendly way of defining an event you want to Respond to. By selecting the actor, the object, the function, (and optionally the target) you can build an event identifier.
Note: By default, if there is any value in the explicit field, Pharmacy Simulator will interpret this as being the event you're interested in - even if the value is invalid. If you wish to use the dropdown menus to define an event, please ensure the explicit field is EMPTY.
Once you have defined your Event Code that you are interested in defining a Response to, you can click the "Edit Responses" button to define what will happen when this Event occurs. This will open the same Response Editor we've seen before, when defining what happens after dialog options are used.
Dependency Rules
In the Dialog Options and Responses sections we were briefly introduced to the concept of Dependency Rules.
These are statements of logic which must resolve to TRUE in order for the given Dialog Option to be available to the player, or the Response to be able to trigger. In most cases these rules will be quite simple, but in some cases they can become complex.
A dependency rule is made up of a set of discrete statements, joined by logical operators, to make an expression. The overall expression will resolve to either TRUE or FALSE. Don't let the terms scare you: consider the below example.
patient1.1|patient1.2 This rule contains two discrete statements "patient1.1" and "patient1.2", joined together by a logical operator |, which means "OR". This makes up a combined expression which translates to "if either patient1.1 OR patient1.2 is TRUE, then TRUE". Another example is of a discrete statement is patient1.anger>0.5.
There are only two logical operators to worry about in our simulation engine.
- & = AND. Both the preceding and subsequent statement must be TRUE for this expression to be TRUE
- | = OR. Either the preceding or the subsequent statement must be TRUE for this expression to be TRUE
When a scenario is first started, all statements will default to FALSE - because they haven't happened yet. Whenever an Event occurs during the scenario the associated statement will become TRUE.
To build up more complex statements, we can string together as many statements as required, but it often becomes unclear how to correctly interpret the statements. Much as in maths, we can clarify using parentheses (). Consider the below example:
patient.1&patient.2|patient.happiness>0.4 - this can be reasonably interpreted in two ways:
- if we have used patient's dialog option 1 and 2, or the patient is quite happy
- if we have used patient's dialog option 1, and either we have used patient's dialog option 2 OR the patient is quite happy
To make it clear which interpretation we intend, we can group statements with parentheses to force the interpreter to evaluate the enclosed section first. i.e. (patient.1&patient.2)|patient.happiness>0.4 - this makes it explicit. Either the patient must be quite happy OR we must have used both dialog option 1 AND dialog option 2.
Event Codes
When we looked at the Event Response Tab we were introduced to the idea of Event Codes, and being able to trigger Responses when these Events occurred.
As we noted then, there are a wide range of events which are occurring during the playthrough of a scenario. For reference, they are listed here.
Note: In most of the event codes listed below [actorID] can refer to either the ID of the actor i.e. "patient1", OR to the player themselves. The player is always identified as simply "player".
Spawn
Whenever an Actor or the player spawns, a spawn event will fire in the form: [actorID].spawn i.e. patient1.spawn, or player.spawn
Player Controls
This Event fires at the start of each scenario, so that we can write content that takes into consideration whether the player is using simple touch screen style controls, or first-person gamer controls. This is useful for tutorialising (i.e. you can tell the player to "touch" rather than "click" something as appropriate), and it is also useful for making your scenario content more accessible. i.e. we can expect that players with gamer controls will be able to move around the scene more quickly and adeptly than those that are using the slower and less precise touch controls.
This is in the form: player.gamercontrols or player.simplecontrols respectively.
Object Interaction
Whenever the player, or an Actor, interacts with any kind of interactive object in any way whatsoever, an Event fires in the form: [actorID].[object name].[action] i.e. player.fists.equip. If there is a target, they will also be included at the end. i.e. player.fists.fire.patient - the player has used fists, executing the "fire" command on the patient.
It is difficult to adequately summarise this type of event, because there are so many potential objects with so many potential functions. When writing this type of event it is recommended to use the dropdown menus provided in the Event Response Tab. These will allow you to choose from all the objects in the scene, and will conveniently display all the possible functions that each object can perform.
Destination Arrival
Whenever the player, or an Actor, arrives at a Destination an event will fire in the form: [actorID].arrived.[waypoint name] i.e. patient1.arrived.dispensary
Dialog Option Used
When a Dialog Option is used, it fires an event in the form: [actorID].[dialog option ID]
Note: Although this is possible, you would not typically need to make an Event Response to respond to the use of a Dialog Option, because Dialog Options themselves already have a set of Responses that they will automatically use, so it is clearer and simpler to use these to respond to dialog options instead.
Response Executed
Whenever a Response is executed this also triggers an event, in the form: [actorID].[objectName].[action].[responseID] - i.e. if the Actor patient1 has just triggered the first Response to the player equipping their fists you would see the event code: player.fists.equip.1
Similarly when a dialog option response is executed, you would see the event code: [actorID].[dialogID].[responseID].
Product Given
Whenever a product is given to an Actor, this triggers several event codes at once.
- [actorID].product_given
- [actorID].given_product
- [actorID].[generic ingredient].given - i.e. patient1.paracetamol.given. Note: a separate event will trigger for each generic ingredient that is listed in the product.
- [actorID].[product name].given - i.e. patient1.panadol [100].given
Note: In most cases it is simpler and more useful to handle product provision through the Product Provision interface. This interface allows you to define what happens when products in certain categories are given to the patient, as well as what happens when certain instruction labels are affixed.
Event Log
Whenever the player or an Actor does something, an event code fires. We have seen in the Event Response section that we can trigger Responses to occur after an event occurs. We have also seen in the Dependency Rules section that we can use event codes as part of our dependency rules that determine whether a dialog option is available, or a Response will fire.
The Event Log is a simple interface that lists all the events that have fired so far through your current play-through of the scenario you are editing. This is provided for reference so that you can look up exactly what events fire during your play-through. You can then use these events to define your Event Responses, and in your Dependency Rules.