User Manual
Contents
Installation
You can install Pharmacy Simulator by downloading and running the appropriate installer from the downloads page.
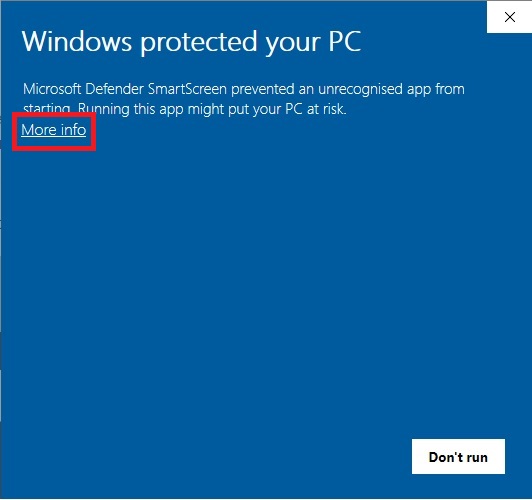
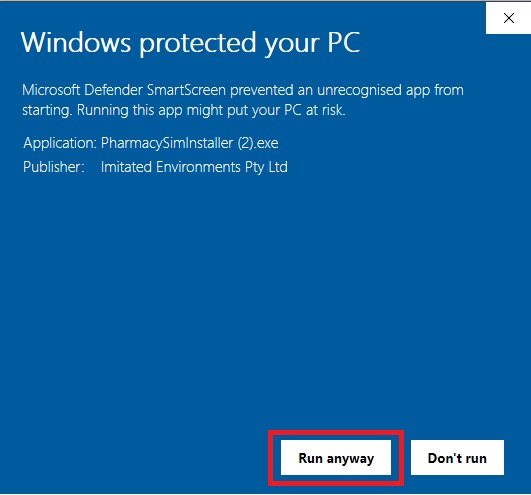
- On Windows, Pharmacy Simulator will be downloaded as a self installing executable file. When you run the installer you may be prompted by Microsoft Defender SmartScreen - click "More info" and verify that the software was signed by Imitated Environments Pty Ltd, then click "Run anyway".
- On MacOS, Pharmacy Simulator will be downloaded as an installer package. When you run PharmacySim.pkg it will install into your Applications folder. You can run Pharmacy Simulator from the Applications folder.
- On Android you can install via the Play Store , and run it like any other app.
- On iOS you can install via the App Store, and run it like any other app.
Registering an account
There are two ways to register an account - either via the website, or via the simulation itself. It does not matter which method you choose.
If you've already installed and run the simulator you will be presented with a login screen - if you've already registered via the website, simply enter your username and password here. If you haven't registered an account yet, look for the "Register" button and fill in the form.
When you login for the first time you will be prompted to confirm your email address. You will be sent an email with a special link. If you click the link in this email your account will be confirmed and you will be able to finish logging in.
Purchasing subscriptions
On Windows/Mac
You can buy subscriptions to unlock the complete Pharmacy Simulator experience from the Buy page. During the checkout process there is a checkbox titled "One for you?" - if this checkbox is ticked, then you will automatically apply one of the purchased subscriptions to your own account.
When purchasing subscriptions you will have to agree to the Service Terms and Conditions of Use and Access.
If you have purchased multiple subscriptions, you can gift these subscriptions to other users, typically students or members of your organisation. Login to your account on the website and go to Manage Subscriptions. Then click the Distribute button and fill in the form. If you have a large number of subscriptions to distribute, you can optionally import a class list file.
When you complete your order you will be given an invoice which will include two options for payment, EFT or Credit Card (via the Stripe credit card service). If you pay via STRIPE your subscription will be automatically activated. If you pay via EFT it may take several days for the payment to clear before your subscription will activate.
On Android and iOS
If you click on one of the locked scenarios you will be given an option to visit the buy menu.
In the buy menu you will be able to choose from various subscription options from the list. You can complete payment through your normal App Store procedure.
Registering for the Free Trial
You can register for the free trial at any time. By doing so you will be granted a registration key that will give you access to a limited set of Pharmacy Simulator scenarios.
You can register for a free trial at HERE.
Activating/redeeming Subscriptions
If you have received a subscription key in your email, you can activate it by clicking the activation link in the email. You will be prompted to either login to your existing account, or register a new account. Once you have logged in, or registered an account, the subscription will be automatically applied to that account. The account details (either name or email address) must match the details given to us by the user who originally purchased the subscription.
Using the controls
Pharmacy Simulator is a 3D experience. As such, the control scheme may be unfamiliar to some users who are not used to playing 3D games. To help with this, we have included two control schemes - a "simple" touch-screen system, and a "gamer" setup that closely matches control schemes used in first-person PC games. On mobile devices which do not have a mouse and keyboard, you can only use the "simple" control scheme.
Simple controls
Click/tap objects on the screen to "interact with" or "use" them.
Click/touch and drag to move the camera.
Click/tap the "Navigation" button at the top of the screen to move your avatar to different places in the Pharmacy.
Click/tap the "Inventory" button at the top of the screen to select items (such as drugs) that your avatar has in their possession.
Click/tap the "Prescriptions" button at the top of the screen to review any Prescriptions you have been given.
Gamer controls
Move the mouse to move the camera.
Use left-click while looking at an object to "interact with" or "use" them.
Use right-click while looking at an object to optionally open an extra context menu, for additional interactions.
Press 'e' or 'i' on the keyboard to open your inventory.
Press the W A S D keys to walk around the Pharmacy.
Press left shift to sprint.
Press Escape to open the Main Menu, or to close menus.
Press 'p' or 'q' to view any available Prescriptions you have been given.
Using the dispensing computer
Click/tap on the dispensing computer to open the dispensing system. There are dispensing computers located at the main dispensary, and also in the counselling room.
If you have recently interacted with a patient that has a record, their record/history will be displayed at the top of the dispensing computer interface.
You can search for products either by product name, or generic component. Once you have found the product you're interested in, you can click the button to select that product.
Enter usage instructions for the label using the provided form.
No need to walk, you can click the "Fetch and Label" button. The helpful dispensing robot will go and fetch the product from the right shelf, and automatically apply the label for you. It will drop the product off on the desk near your dispensing computer.
Click/tap on the product on the desk, then select "Give", and click/tap on the patient to give the product to the patient.